Help, My iPad Keyboard Is Stuck In The Middle Of My Screen!

In this post, you’ll learn how to move the keyboard on your iPad if it gets stuck. I’ve also outlined several ways on how you can fix this issue in case it happens again, so read on to find out more.
RELATED: 9 Best iPad Pro Keyboard Alternatives To The Apple Smart Keyboard
- What A Stuck iPad Keyboard Looks Like
- How To Fix A Stuck Apple iPad Keyboard
- Reboot Your iPad
- How to Move the Keypad on iPad
- How to Split the iPad Keyboard
- Third-Party iPad Keyboards
- How to Use Third-Party iPad Keyboards
- Use an External Keyboard
- How to Connect an External Keyboard
What To Do When Your Apple iPad Keyboard Is Stuck
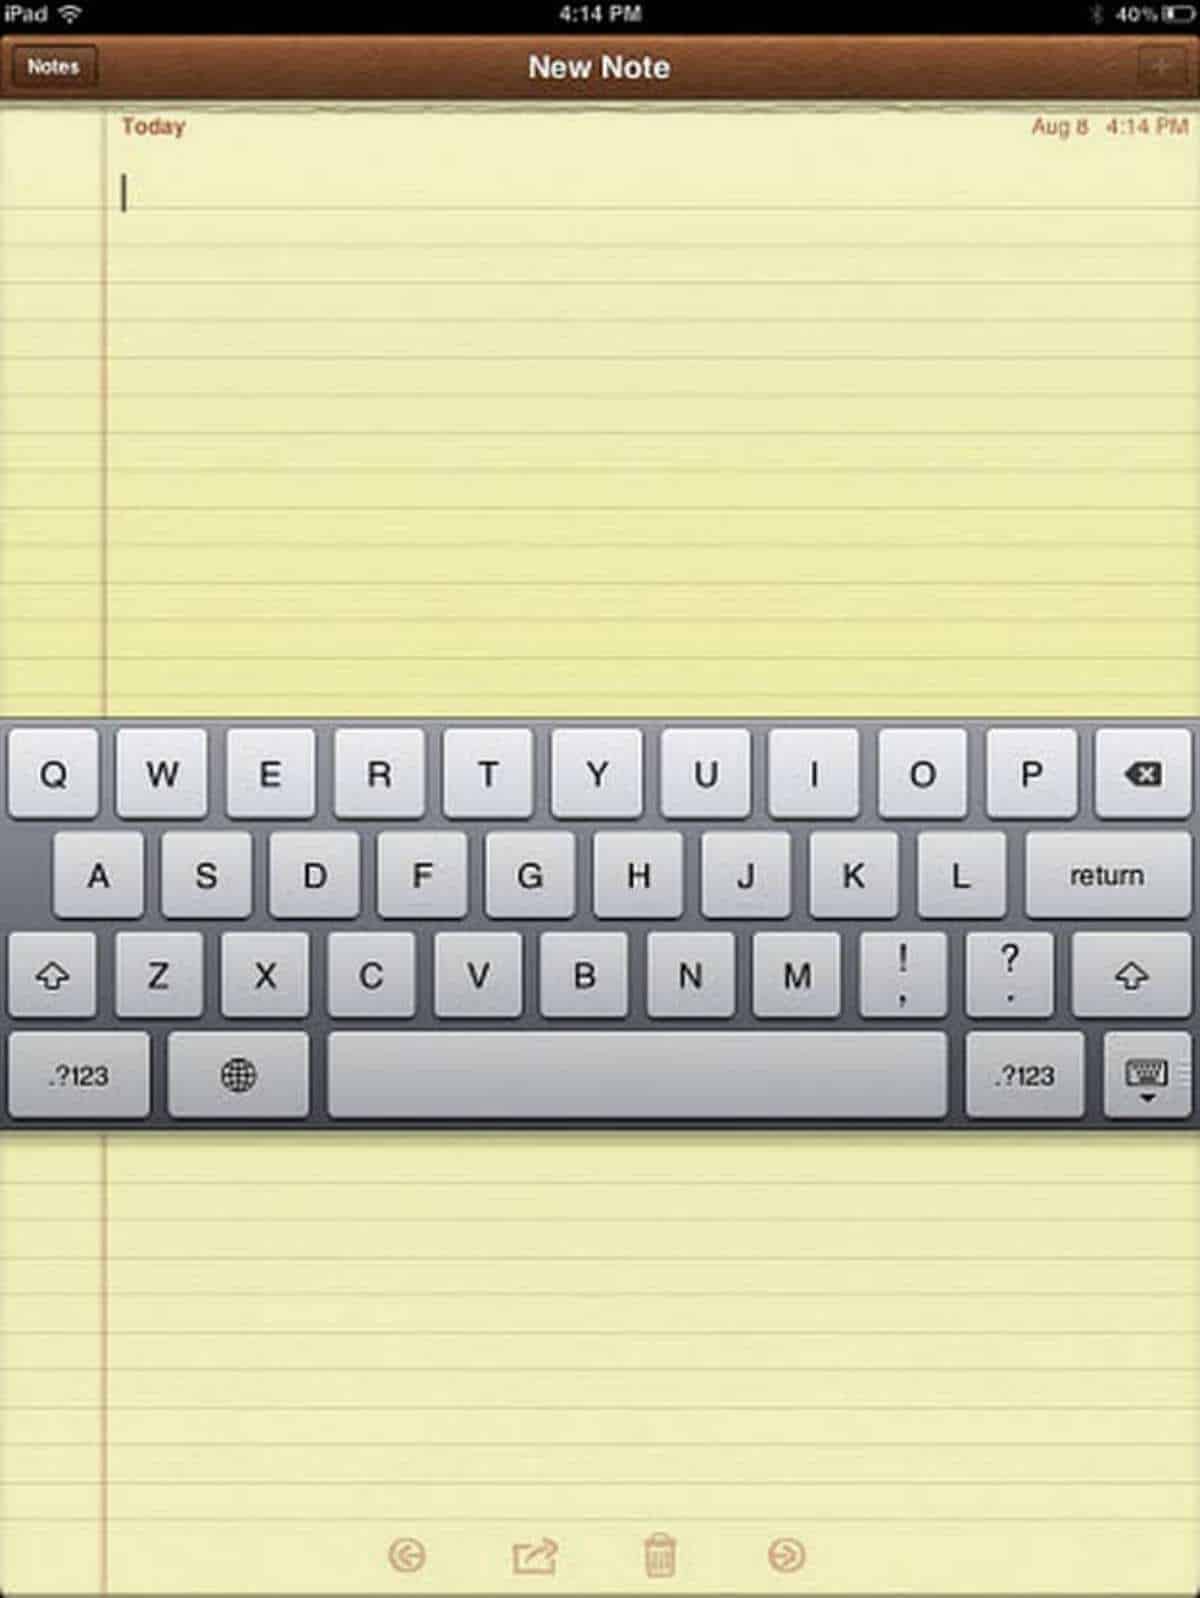
What A Stuck iPad Keyboard Looks Like
One day, I was using my iPad when I noticed my Apple iPad keyboard was showing up in the middle of my screen. At the time I had no idea why this happened, nor did I know how to fix it. And believe me, if this happens to you, you’ll want it fixed as quickly as possible. Learn how to fix this issue in this post.

Here’s what a stuck keyboard looks like:
The reason you’ll want it fixed is that it makes it nearly impossible to type when the cursor on your display gets to the middle of the screen because the on-screen keyboard covers whatever you are typing.
How To Fix A Stuck Apple iPad Keyboard

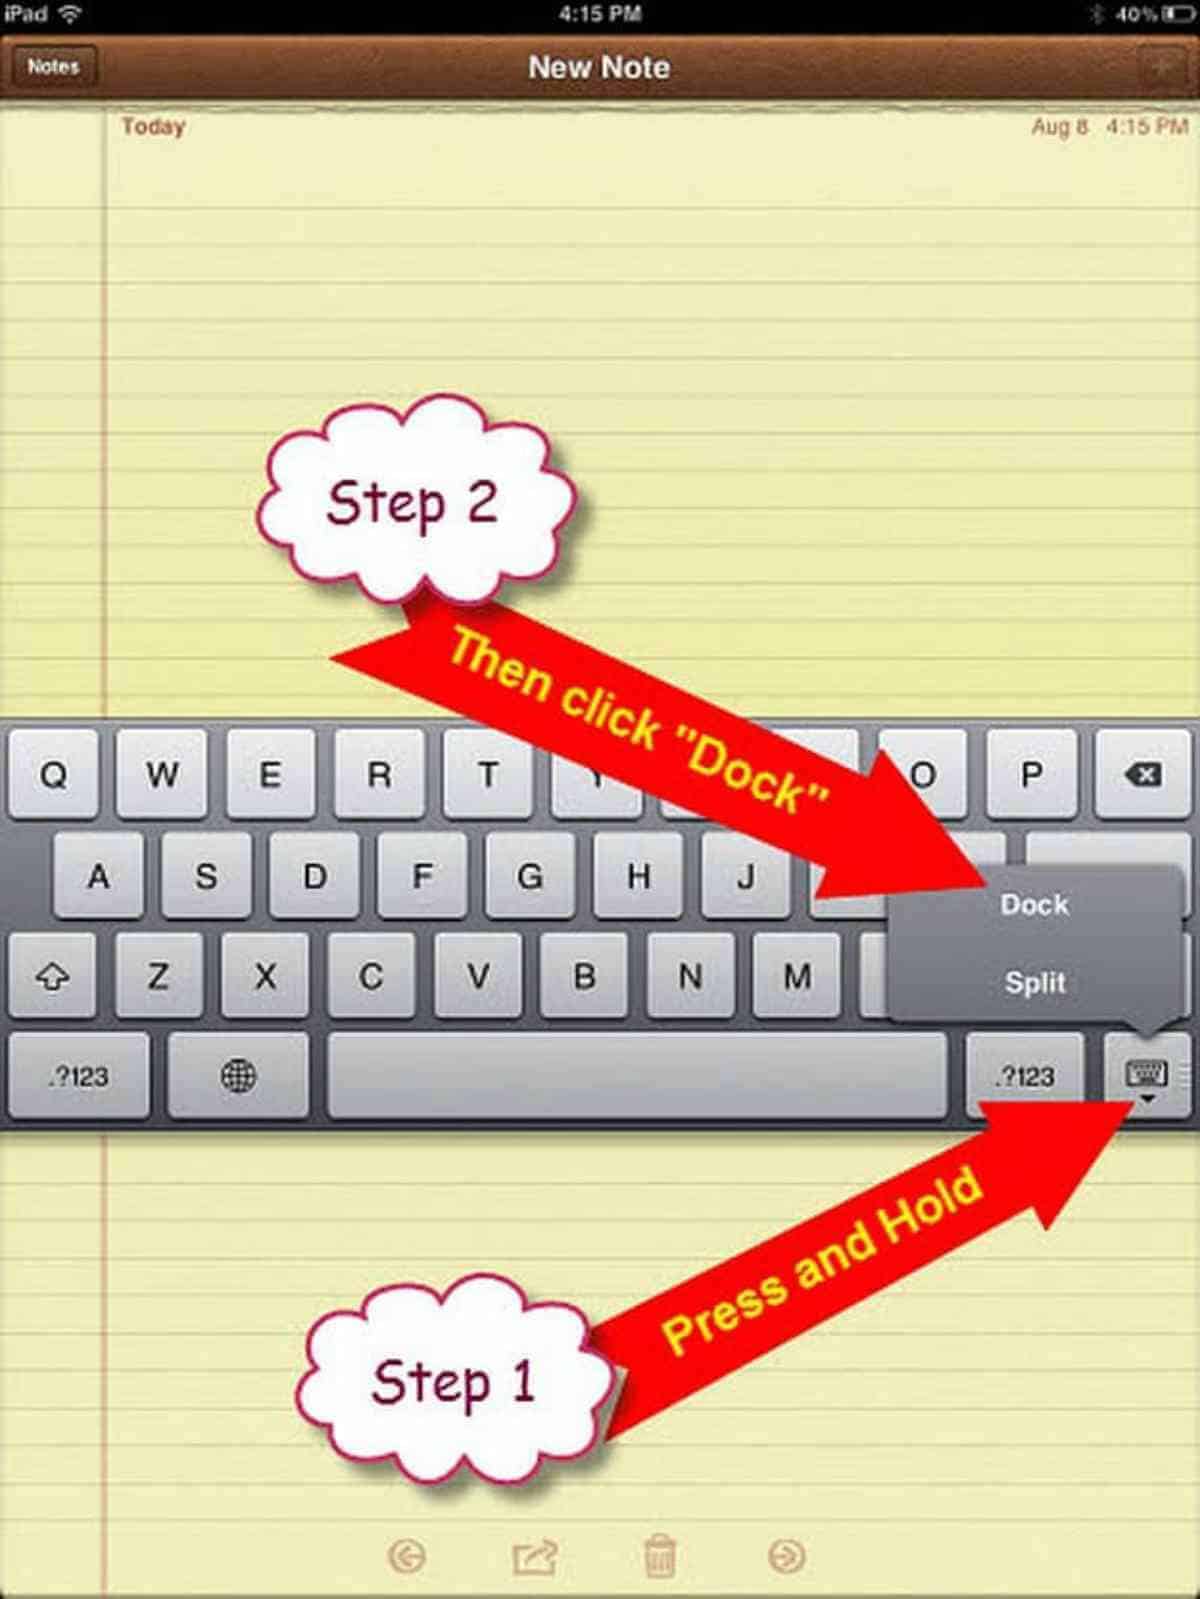
Luckily, it’s pretty simple to fix. Just press and hold the button in the very bottom-right of the keyboard until a pop-up menu appears. Touch the Dock option and the on-screen keyboard obediently returns to the bottom of the screen.
Reboot Your iPad
So you tried pressing the Dock option, but the key doesn’t seem to be registering. What do you do if you can’t seem to do anything?
A reboot solves a lot of iPad keyboard-related issues. Hold the power button on the side until the Apple logo appears, and your iPad should be back on the Home screen.
Unfortunately, if you were in the middle of taking down some notes, or composing that Facebook post, you would have to start over.
How to Move the Keypad on iPad
Once you got the keyboard back to where it’s supposed to be, you can then raise or lower the iPad keyboard until it’s where you want it. Here’s how to do it:
- Hold the Keyboard button on the bottom-right corner of the on-screen keyboard.
- Choose Undock from the options.
- Tap, then drag the keyboard up and down until it’s where you want it to be.
For most users though, it’s not very practical to raise the keyboard too high. Otherwise, you wouldn’t be able to see what you’re writing on the screen.
How to Split the iPad Keyboard
The iPad keyboard can be tough to use with your thumbs. Here’s how to convert it to the split layout for easier thumb typing.
- Hold the Keyboard button.
- Choose Split from the options.
- Your iPad keyboard should then split itself into two.
If this layout isn’t your thing, you can fix the split layout on the iPad by holding the keyboard button and selecting the Dock option. Your keyboard should then get back to the usual iPad keyboard position.
RELATED: 25 Essential iPad Accessories
Third-Party iPad Keyboards
If the default keyboard is still giving you problems, you may want to check out some third-party iPad keyboards. Here are some of the available options at your disposal:
- GBoard: Google’s iOS keyboard offering is surprisingly robust. You can swipe to type words, search for the right Emoji, and even find that perfect GIF reaction
- SwiftKey Keyboard: SwiftKey’s main feature is intelligent typing. This means SwiftKey uses the words you type on your iPad to create better text suggestions for quicker and more accurate typing
- Fleksy: Fleksy is for users who care more for speed than accuracy, as the app determines what you want to type based on your typing style and auto-corrects it for you. It also has one of the most extensive color theme libraries, so there’s one keyboard theme for everyone.
How to Use Third-Party iPad Keyboards
To use a third-party iPad keyboard, do the following steps. You should then be able to use the third party keyboard.
- Tap on the Settings app.
- Tap on General, then choose Keyboards.
- Tap on Keyboards on top of the screen.
- Select Add New Keyboard
- Go to Other Keyboards and choose on the keyboard you want to use.
Important Note: Due to iOS’s restrictions, you’ll be using the default iOS keyboard every time you type a password. This is normal and shouldn’t affect how the third-party keyboard operates.
Use an External Keyboard

For those of you who do quite a lot of typing on the iPad, getting an external keyboard is another option. This is especially good if you use word processor apps like Microsoft Word and Pages.
These can come in the form of a physical keyboard similar to what you’ll see on desktops or integrated into an iPad case.
Here are some advantages of using an external keyboard:
- More screen real estate: When you connect an external keyboard, the on-screen keyboard slides down. This allows the app to use the full screen, therefore giving you more space to write.
- Keyboard switching: You’ll get an app switcher similar to those you find on Macs. This lets you switch apps and return to the home screen from the keyboard.
- Shortcuts: Having an external keyboard gives you access to various shortcuts like Copy and Paste. Some apps even let you control everything from the keyboard.
How to Connect an External Keyboard
Most external keyboards connect to the iPad using Bluetooth. Here are the steps on how to connect to the keyboard using Bluetooth.
- Put the keyboard to pairing mode (how this is done depends on the keyboard).
- Go to the Settings app, then select Bluetooth.
- Once you see the keyboard on the list of devices, tap on it to pair.
Some external keyboards, like Apple’s Smart Keyboard, connect via the Smart Connector.
Smart Connector Definition: A port included on some iPad Air and iPad Pro models located on either the left side of the iPad, or on the lower rear end.
But there are downsides to this kind of keyboard:
- Keyboards are only compatible with certain iPad models.
- Choices are much more limited.
- More expensive compared to other types.
- Has to touch the iPad to work.
This connector transmits both data and power, and any connected device is recognized immediately. No need to do anything else.
Howcast shows you how to move your Apple iPad keyboard around the screen:
Your Apple iPad keyboard may be very customizable, but sometimes that customization can lead to undesired consequences. Thankfully, there is an easy fix for it that requires no more than 20 seconds of your time. We hope this guide has helped you fix your keyboard.
Have you ever experienced this problem on your Apple iPad keyboard before? Tell us about your experience in the comments section.
Up Next:
- The New Apple iPad Lineup
- I Want To Order A Grilled Cheese On An iPad!
- Netflix Viewing History | How To Monitor Viewing Activity Right Now
Editor’s Note: This post was originally published on August 12, 2012, and has been updated for quality and relevancy.


