PowerPoint Transitions Basic Tutorial
 PowerPoint has LOTS of special effects. One easy special effect is the PowerPoint Slide Transition. PowerPoint uses these transition effects to move from one slide to another. Although, I recommend using very basic animation when you are first learning PowerPoint. By working on your in-person presentation skills first, then slowly focusing on more transitions in Powerpoint, only then can you snazz-up the PowerPoint file! Of course, before snazzing it up, we have to put in mind that we never want the effects to be more exciting than the content of our presentation.
PowerPoint Transitions For A Better Presentation
Create or Open a Practice Presentation
Before we continue, you need to open your practice document or PPTX file from our PowerPoint Tour, where we created three Powerpoint slides. Another way is to create a simple PowerPoint document with three or more slides because now it’s time to fine-tune your show.
Powerpoint Transitions

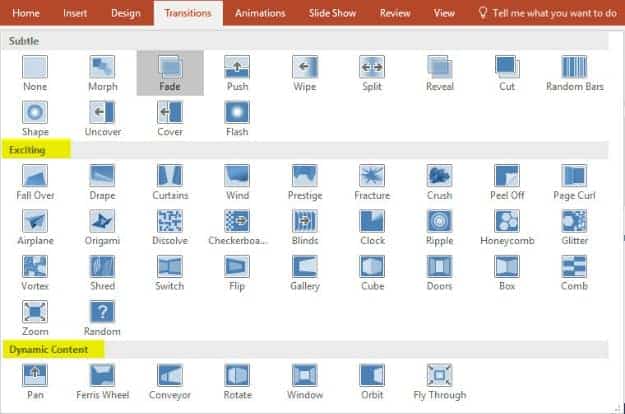
Ordinarily, if you have no specific transition or animation effects selected, your slides simply change quickly from Slide 1 to Slide 2 with the click of a mouse, but we’ll create a smoother transition using the “Transitions” tab. The most basic Transition, and my favorite, is to gently fade from one slide into the next, so click Transitions tab and from the drop-down menu choose Fade. PowerPoint will give you a preview of the transition when you select it.
There are even more transitions if you click the More Choices arrow, highlighted yellow, but for now, stick with Fade in the Subtle group.
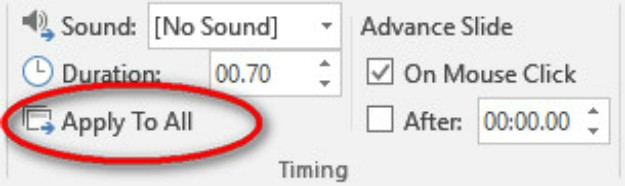
With ANY change to the Transitions tab, ALWAYS click the Transitions tab>Timing section>APPLY TO ALL button. This tells PowerPoint to use the same transition for each of your slides, which keeps the audience attention on you, not on how your slides change from one to the next.
Use Reading View to Watch Your Slide Show
![]()
From the slide master or task pane, go back to Slide 1, and watch your show by clicking the Reading View shortcut at the bottom right of your screen. It looks like a little book, and it shows your presentation within the PowerPoint window… you see your slide, but you still see the rest of your computer desktop and Taskbar. Your show will always start from the current slide with these icons, so remember to click on Slide 1 before you start.
Press the Escape “Esc” button on your keyboard to return to Slide 1 and the normal view after watching your show.
Transition Sound Effect or No Sound Effect

Sounds effects are available but highly distracting to your audience. For fun, play with the transition sound effects by trying out the Transitions tab and from the pull-down menu, opt for Timing section>Sound drop-down arrow. Give yourself an applause sound effect… just this once. Use the Transitions tab>Preview to hear it. Now go back to “No Sound” when finished. My recommendation: NEVER use a sound effect with your transitions.
Self-Running Slide Show – without a Mouse Click
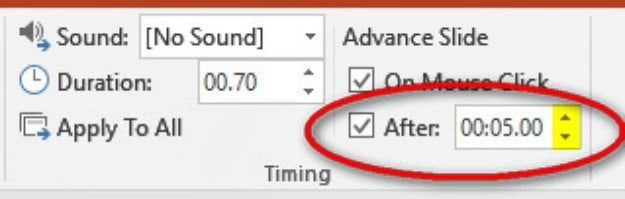
Transition by mouse click is the right choice for a live presentation because you will be talking about each slide before clicking and moving to the next. You don’t want your show to get ahead of you or lag behind. But… let’s say you are setting up a slideshow for an open house. You will be greeting guests, and you don’t want to click the mouse between each slide. You want the slides to transition from one slide to the next every five seconds automatically. Go back to the Transitions tab. On the right of the Transitions tab>Timing section, you can tell PowerPoint to advance the slide in a specific number of seconds. Click the “After” box and click on the time up arrow. If you click the little up arrow five times, it will go up to five seconds, “00:05.00.”
I recommend leaving the “On Mouse Click” box checked because you can always move to the next slide before the five seconds is up by clicking sooner. If you uncheck “On Mouse Click” you will have to wait for the five seconds because your mouse will be disabled during your show.
Don’t forget to click Transitions tab>Timing section>Apply to All after ANY and EVERY change to the Transitions tab. From Slide 1, watch your self-running slide show by clicking the Reading View icon.
Change Transition for One Slide
What if you are a rebel and you really want to try a different transition or custom animation for your middle slide? Select Slide 2 from the Navigation Pane. Now in the Transitions tab>click a new transition; let’s get crazy and pick a Transition that is anything but ordinary. Click the more-choices arrow at the bottom right of the Transitions to This Slide section. Pick one from the Exciting or Dynamic section, such as Ferris Wheel.
You can make this slide last longer by increasing five seconds to seven. All these transition changes will only apply to Slide 2, unless you select “Apply to All.”
Preview and Make Final Changes

Return to Slide 1 and use the Reading View shortcut to watch your show. Does the odd transition in the middle seem a little distracting? New PowerPoint users are famous for using too many effects, and you want to look like a pro, right?
Using your new skills, go back to a Fade transition “on Mouse Click” only for all your slides. Need a hint? From the Transitions tab, select Fade. Uncheck the “After 5 seconds” box, and check the “On Mouse Click” box.
What’s the one step before you view your presentation? That’s right, click Transitions tab>Timing section>Apply to All. Now watch your slideshow, and make any other necessary changes. It’s your show.
Simon Sez IT shows how to add with Powerpoint transitions and effects in your presentation.