How to set your default printer in Windows
You’ll probably never know (or care) how it happened but every so often your default printer setting in Windows will get changed to something other than the printer you want to use. It’s probably because you installed a new piece of software that messed with the setting or because you accidentally changed it yourself but, like I said, since you probably don’t care I’m just going to show you how to fix it.
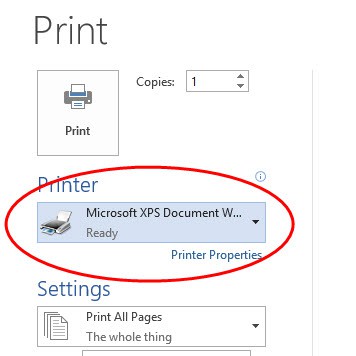
But first things first. How do you know when this happens? The easiest way to find out is to open any software program, like Microsoft Word, that has print capability. Then go directly to the Print function. Whatever printer is selected on the screen is your default printer. Usually, when things go bad, printers like “Microsoft XPS Document Writer” or something generic like “Fax” show up as the default printer.
You can manually override the printer by selecting the drop-down arrow next to the printer name and then selecting the printer you want to print to. You’ll have to do this every time you print and believe me, it gets old after a while. It’s much easier to have the right printer show up correctly the first time, every time.
Start with the Control Panel
To set (or reset) the default printer, you’ll need to go to the Windows Control Panel. In Windows 7 and previous versions you should be able to get to the Control Panel by clicking the Start button and then clicking Control Panel in the Start menu (usually on the right-hand side).
On Windows 8.1 you can right-click the Start button from the Desktop and then left-click Control Panel. Or from the start screen click the search button and start type “Control Panel” for the search. You can also just start typing “Control Panel” from the start screen without clicking the search button.
If you are successful, you should see a window similar to this:
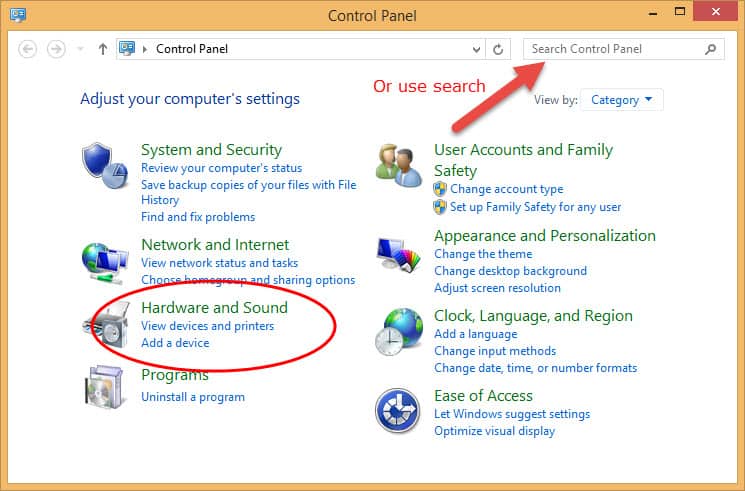
Next, you’ll want to click the link under “Hardware and Sound” labeled “View devices and printers”. If your Control Panel windows looks different than the one shown above, try typing “printers” in the search box near the top of the Control Panel window.
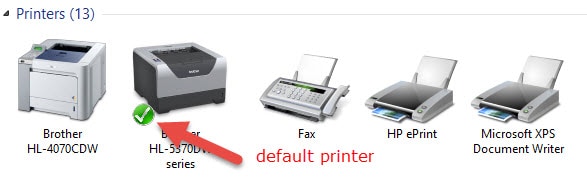
You should now see a list of all of the printers you have installed. Don’t worry if you don’t recognize all of them, just look for the one you want to be the default.
When you find that printer, right-click on the printer icon and then left-click on “Set as default printer” from the pop-up menu that appears.

That’s all there is to it! You can visually confirm which printer is the default printer by looking for the icon with the green checkmark overlaid on top of it.
The next time you go to print from any application, your default printer will be selected automatically.