Microsoft Word Lesson 2: Word Document to PDF, Inserting a Date, Alignment, and Saving
 So, you’ve mastered the basics of Word and want to move forward. After you’ve successfully begun a word document, it’s only natural to want to perfect it. In this case that means inserting a date, aligning everything just how you want, and then converting your word document to PDF to solidify the format you worked so hard on.
Word Document to PDF: A Step-by-Step Guide
In the second installment of our Microsoft Word Lessons, we’ll be learning how to reformat a word document to PDF. We’ll go into all the benefits of a PDF doc later in this article, but in short, exporting your text as a PDF gives you the peace of mind that your audience will see your words exactly as you intended and formatted them.
Open a Recent Document
In our previous lesson we created a new Word document. To begin our journey from converting a word document to PDF, we’ll need that same doc. Click on the File tab>Open button, and a list will appear of all your most recent documents.
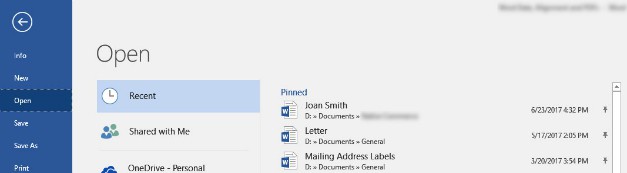
Your new document should be right near the top of the list. Do you see the little pushpin to the right of the document? If you click that pushpin, it will pin the document to this list and it will always be there right at the top. For example, on my home computer I have a letter template, my mailing labels, and instructions for my pet-sitter pinned to the Open list.
Click on your document and it will open. It should have your name and address at the top and two sentences about you.
Date
Next, we’re going to add some room for the date. Put your cursor at the beginning of the first paragraph (or sentence) and click. Press Enter twice then cursor back up twice to make room for the date. The cursor keys are those little arrows on the right, or you can just click where you want your date to go.
We could type the date, but let’s have Word do it for us. Click on the Insert tab just to the right of the Home tab. These are all the items you may insert into your document. Near the right in the Text section is the Date and Time option.

Click Insert tab>Text section>Date & Time, and the Date and Time menu will appear.
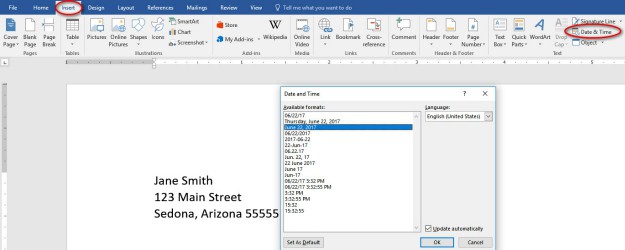
You will have several choices of date format in this window. Pick the one that has the month written out with the date and year, for example “June 22, 2017.”
Now look at the bottom right of the Date and Time window. There is a small box checked next to the words Update Automatically. If this box is checked, every time you open your document, the date will update to the current date. This can be a good thing or a bad thing. We are creating a letter template. A template is a form that you can use over and over with a few changes. In our letter template the date should always be current, so we want to be sure the Update Automatically box is checked.
If you are typing a big report, you may want to not the date that you started the report. In that case, you want to keep the original date and not update automatically. If that is the case, you would uncheck the box. For today, be sure Update Automatically is checked, and press OK.
There’s No Place Like Home (Tab)
As a habit, after you have used any tab besides Home, go back to the Home tab. In this case, we are in the Insert tab, and everything looks unfamiliar. Click on Home and Word will look normal again.
Alignment
Your name and address is on the top of your letter template. It looks professional, but a bit dull. Select your name and address by dragging through. From the Home tab>Paragraph section, notice the little sets of horizontal lines.
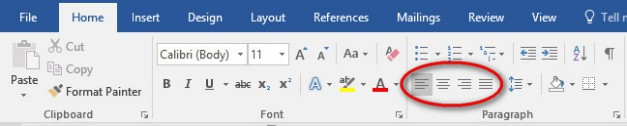
If you hover your mouse over those lines they show Align Left, Center, Align Right, and Justify. Justify stretches all the words between the margins to that they line up on the left and right, but it only works on sentences in a paragraph.
With your name and address selected, click Align Right to see what happens. No go back to Align Left, which is where we started. Now select Center.
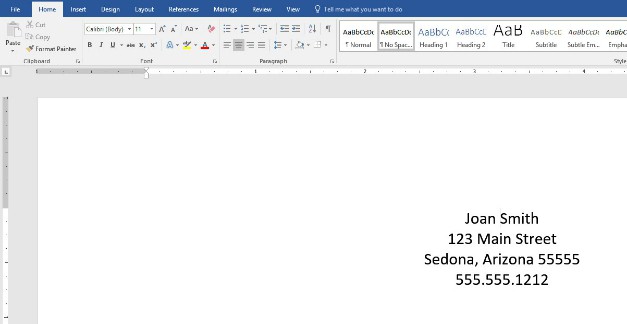
That’s how we want our name and address for our letter template. Notice that the date and our paragraph stay aligned to the left because we didn’t select them.
Formatting Review
Since we are ever-so-slowly creating a letter, let’s make our letterhead stand out. Use the formatting skills you learned in our last lesson to make our letterhead look like stationery. Triple-click your name, and make it one or two sizes bigger with Home tab>Font section>Increase Font Size.
Now after your address, press Enter and add your phone number. That way, a business will know where to call if they have a question about your letter. Be sure to include the area code. I like to use periods between the numbers like “555.555.1212.”
Now drag through your name, address and phone number. Change it to your favorite, legible font with Home tab>Font Section>Font. Pick a professional looking font, not a silly one here. Try out a few.

Then click Home tab>Save or the Save icon in the Quick Access toolbar when you are finished. But don’t exit yet! We’re not getting to the exciting part of changing your word document to PDF, something which will make it even more professional.
Benefits of Changing a Word Document to PDF
Our last topic for today is a PDF. What’s a PDF? It is a snapshot of our document that saves all our settings, our date, our font and formatting so that you can email the document. If we were to just send someone our Word document, they could delete and type whatever they wanted, then say it was ours, right? We don’t want that. We want to freeze our document just the way it is, so we want to change our word document to PDF.
Since everyone started using the internet and email, there have been lots of problems sending documents. After all, some people use Macs, some use PCs, and some people only use their phones. Which software people use — and even which version of the same software — can become a big problem when you are trying to share documents. If I create a new Word 2016 document on my Windows PC and send it to Mac users or even Windows PC users who have Word 2007, they will get an error message when they try to open my document. We definitely don’t want that.
That’s why, back in the 1990s, a company called Adobe created Portable Document Format (PDF). This format allows users to look at, but not edit, another person’s document. Not only is it readable with free Adobe Reader software, but it takes up a lot less memory. That means you can send and receive the document more quickly.
Save as PDF
Microsoft Office has a feature built in to all their products that allows you to easily change a word document to PDF. I think we saved our document, but do it again – it never hurts to save often. Do a quick Save (File tab>Save or Quick Access>Save) of our letter so we have the current version for our next lesson. Saved? Now go to the File tab and look for the Export button. Click File tab>Export.
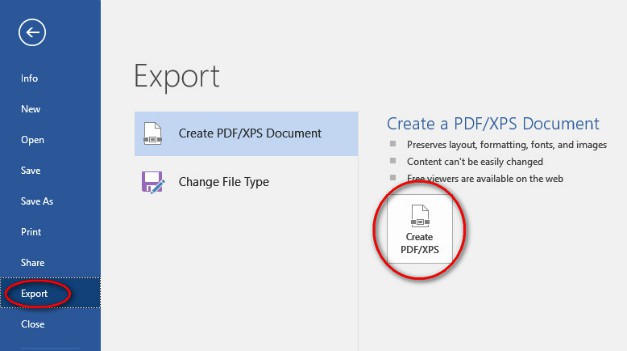
Notice the “Create PDF/XPS Document” is the default choice on the Export screen. (In case you are wondering, XPS is Microsoft’s version of a portable document format.) Click the Create button and save your PDF in the same folder as your original document.
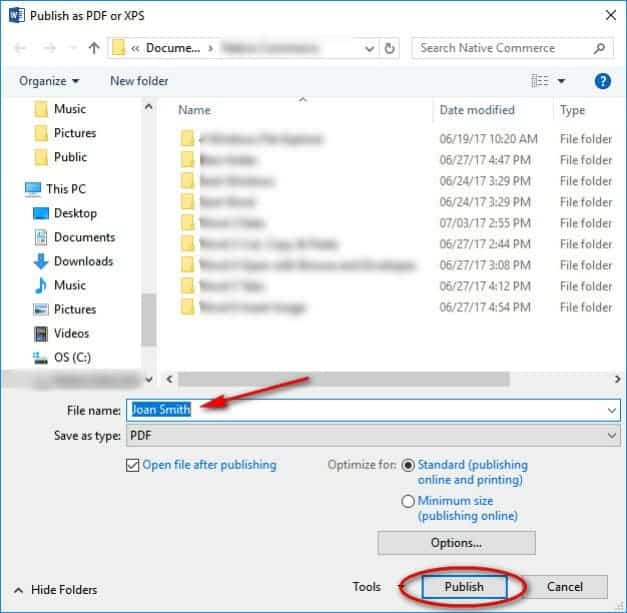
It already guesses you want the same name; you can change it, but let’s leave it for now.
The final button on this screen is “Publish” not save. Click “Publish” and two things happen. First the document is saved as a PDF, then the PDF version of our document will appear on our screen.
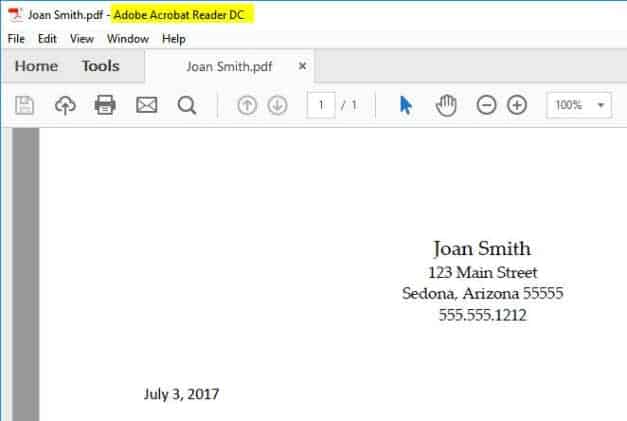
Go ahead and scroll down to the end. This is a good habit to make sure the whole document saved properly. Notice there is a File tab in Adobe Reader. If you click it, it looks very similar to the File tab in both Notepad and Word. Exit out of both Adobe Reader and Word by clicking the Exit “X” in the corner.
In a future lesson, we will use File Explorer to find all three new documents we have created so far. Be sure to wait at least one day to do this so we can compare our inserted “Update Automatically” date in both our Word document and our PDF.
Did this help you change your word document to PDF? What would you like to learn in the next Microsoft Word Lesson? Let us know in a comment below!
Up Next: Now that you’ve got the basics of word, Learn How to Make a Powerpoint Presentation!